[Mac] MacBook Pro 2011 Late SSD Replacement
[Preface]
The original storage of my MacBook Pro 2011 is a 5400-rpm 500G HDD from
Hitachi, which is not fast enough nowadays. And I heard that there are some
changes of MacOS architecture have been made, if the reading speed of the
drive is not fast enough, then it will take more time to boot on. This MacBook
Pro was for my dad, that he can use it at home, but he rarely use it. So, he
give it to me for my university propose, such as coding, demo, or
presentation, etc. This MacBook Pro was quite expensive and actually the
equipment was not bad at that time, but just needs a little upgrade.
This is the overview of the MacBook Pro. And let's move forward.
▼Macbook Pro overview

▼Has upgraded RAM before (4 to 8).

▼Umm.. really need a upgrade..

[Requirement]
A MacBook ProA SSD(I used ADATA SU800)- Download the latest MacOS from AppStore
- A USB that >8G storage
- Screwdriver (PH00 and T6)
- Some tools(tweezers and plastic sheet)
- Backup your Mac (tons of backup methods, I will skip this part)
A cup of drink/coffee
I recommend to buy a screwdriver & tool set, which should include 5 and
6.
[Step by Step]
- Create a bootable USB Drive
I referred this article, which has more detail about this.
Or check out the official guild from apple
How to create a bootable installer for macOS
However, if I use the command from the article, some error will happen. And someone leave a commit said I can try to add "--nointeraction" after the original command. In my case, the whole command should look like this:


Disassemble all the thing!
MacBook Pro SSD Upgrade
You can follow this YouTube video to do that.
Only a few points want to mention:
1. The screws are not all the same.


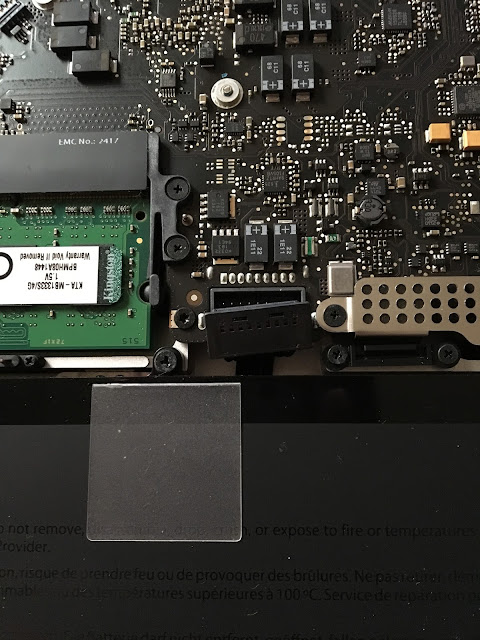
Others should be OK if you follow the YouTube. Usually, the 2.5"SSD will come with a pad/plastic for increase the height. Remember to put it on. Also, in my MacBook Pro, the original HDD has a plastic, don't forget to put it on.


Many people will create a Fusion Drive, which has SSD's speed and HDD's capacity. But I don't want to buy another new HDD. Or if using the old one, that is not fun if the HDD is died. So, I will only upgrade SSD.
After I disassemble it, I just realize that the weight doesn't reduce as I thought... But, whatever.


Here I shut it down and screw the case before install the MacOS.


However, if I use the command from the article, some error will happen. And someone leave a commit said I can try to add "--nointeraction" after the original command. In my case, the whole command should look like this:
$ sudo /Users/lin/Desktop/Install\ macOS\ Sierra.app/Contents/Resources/createinstallmedia --volume /Volumes/T --applicationpath /Users/lin/Desktop/Install\ macOS\ Sierra.app --nointeraction▼After running, you USB should look like this

- Disassemble
MacBook Pro SSD Upgrade
You can follow this YouTube video to do that.
Only a few points want to mention:
1. The screws are not all the same.
▼Like the top one and bottom one in the picture

2. After taking off the case, you MUST disconnect battery first


3.Be careful of the flat cable for the drive
Others should be OK if you follow the YouTube. Usually, the 2.5"SSD will come with a pad/plastic for increase the height. Remember to put it on. Also, in my MacBook Pro, the original HDD has a plastic, don't forget to put it on.
▼Like this


Many people will create a Fusion Drive, which has SSD's speed and HDD's capacity. But I don't want to buy another new HDD. Or if using the old one, that is not fun if the HDD is died. So, I will only upgrade SSD.
- Disassemble CD driver
I will remove the CD driver because I never use it. And by removing it, I can reduce the weight a little bit. I followed this video to do it.
Just follow the video if you want to disassemble it. It's harder than remove HDD, that require to disassemble more thing. If you don't want to remove it, you can skip this part.
The video I found is for someone who want to install second HDD on the slot of the CD drive. But I don't need so large capacity. If you want to have the SSD's speed, HHD's capacity, but don't want to create the Fusion Drive, then you can follow the video.

After install the SSD, don't assemble the case right away. Be sure that the SSD can be read first or you will need to do it again. Also, check all the cables are connect perfectly.
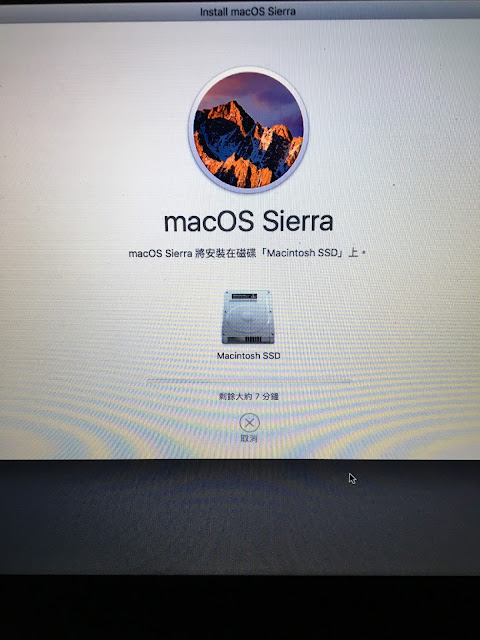
- Check and install MacOS
Plug in you USB you just create before boot up, and keep pressing "option" button during the boot. Then you should be able to see the following screen.

Click USB drive

Select disk utility.
OK, if everything going well, than you can see the SSD you just installed. Here, we should format it.


Here I shut it down and screw the case before install the MacOS.
You should always in charging during the installation. It may cause a serious error if you run out of the power during the installation. Then, just follow the instructions to finish the installation!


- Enable Trim
This is a important feature for a SSD. But Apple only turn it on if the SSD is made from Apple. We need to turn it on manual.
Follow this website to do it:
Done!
Enjoy extreme speed!


Comments
Post a Comment